

How to Use Teams Live to Host a Webinar
Teams live events is an extension of Teams meetings, enabling users to broadcast video and meeting content to a large online audience. These are meant for one-to-many communications where the host of the event is leading the interactions and audience participation is primarily to view the content shared by host. Depending on your audience, Teams Live events can be set to have attendees only within Texas State, or open to the public at large with the correct link.
NOTE: Unlike Zoom, you do not need a special license for holding an event with over 300 attendees.
Select Your Team
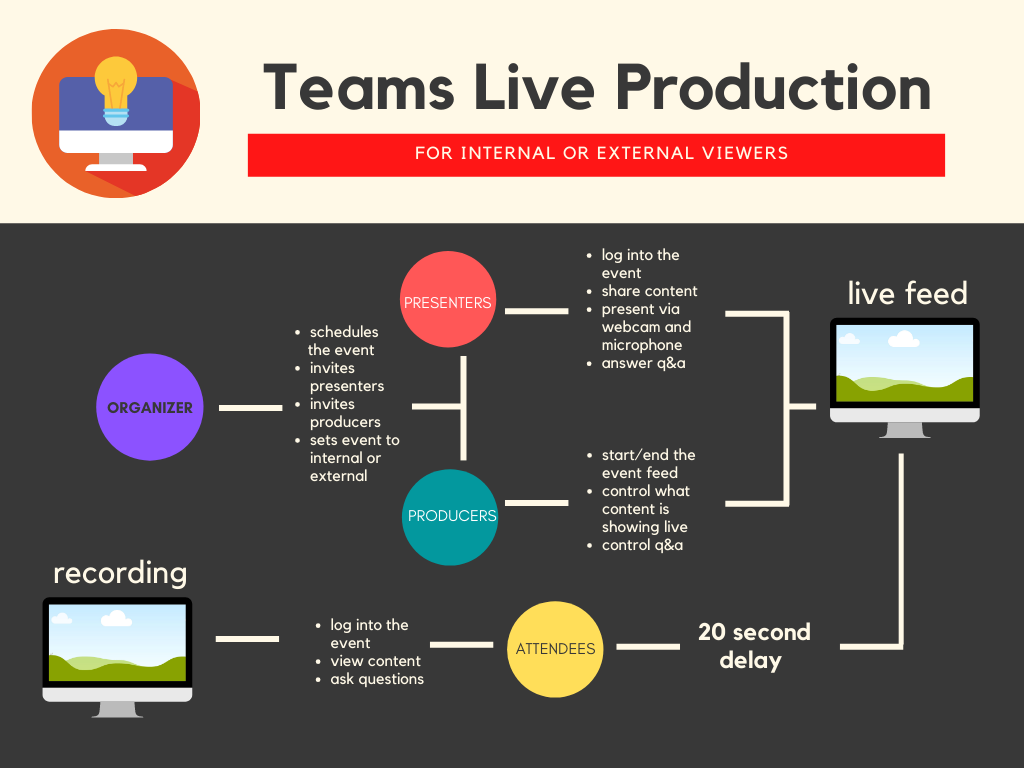
Live events in Teams empowers multiple roles (organizer, producer, presenter, and attendee) to successfully broadcast and participate in an event.
- Organizer: organizers are responsible for creating the event, setting permissions, and inviting the attendees. For an organizer checklist, click here.
- Producer(s): producers are responsible for managing the event live—they control the live event stream by queuing and sharing presenters and content.
PRO TIP: You will need a minimum of two producers for a large Teams Live event, it is difficult to manage solo. - Presenter(s): presenters are the people actually giving presentations, showing content (slides, videos, music), or holding panels and/or moderating the Q&A.
NOTE: Presenters should be running Windows 10, as you cannot present from a Mac. - Attendees(s): attendees will actually watch and interact with presenters during your event. Before you begin, determine if you will have attendees outside the University. If so, you will need to make the event open to the public.
Scheduling
Teams provides the ability for the organizers to create an event with the appropriate attendee permissions, designate event team members, select a production method, and invite attendees.
- To create a live event in Teams, click Calendar.
- Click +New meeting, and click Live event.
- Add the meeting title, date and time information, and other details.
- In the Invite people to your event group box, add the names of the people who will be presenting and producing the event (see Select Your Team), and click Next.
- Under Live event permissions, choose who can attend your live event: People and Groups, Org-wide, or Public.
- Under How will you plan to produce your live event?, choose to record
- Click Schedule.
- Click the Get attendee link to copy the unique code. This is what you post or send to anyone attending the event.
NOTE: Once the event is scheduled, be sure to make any changes in your Teams Calendar. Do NOT edit this event in Outlook.
Production using Teams
The video input is the foundation of the live event and it can vary from a single webcam to a multi-camera professional video production. Teams production method allows users to produce their live events in Teams using their webcam or using A/V input from Teams room systems. This option is the best and quickest option if you want to use the audio and video devices connected to the PC or are inviting remote presenters to participate in the event. This option allows users to easily use their webcams and share their screen as input in the event.
External app or devices allow users to produce their live events directly from an external hardware or software-based encoder with Stream. This option is best if you already have studio quality equipment (for example, media mixers) which support streaming to a Real-time Messaging Protocol (RTMP) service.
The producer’s screen has three areas. What’s live is on the right side. On the left, the Queue shows you what’s next, and the bottom tray has all content you can share.
- Click Calendar, locate the live event, and click Join.
NOTE: You can only join as a producer if you are the organizer or have been assigned this role by the organizer. - To share your desktop or a window, click Share and add the content you'd like to share.
- Click the content you want your audience to see from at the bottom of the screen to preview it in your queue (on the left) before sending it to what's live (on the right).
- Click Send live to move a feed from the preview queue to live.
- Click Start to start broadcasting.
Presenting
In Teams, click Join to join the event as a presenter. As a presenter, you share many of the basic capabilities of a producer, but you don't have as much control over the video feeds or the live event itself.
PRO TIP: Your camera must be turned ON to present. Producers cannot queue presenters that do not have live camera. Make sure your camera is on, and unmute your mic just before presenting.
NOTE: Presenters must be using the desktop version of Teams on a Windows computer running Windows 10. You cannot use a Mac to present.
- Click Calendar, locate the live event, and click Join.
NOTE: You can only join as a presenter if you have been assigned this role by the organizer. - Wait for your cue to present.
Just before going live, unmute your mic. When you are live, a red box will appear around the thumbnail of your video in the gallery view. - To share your desktop or a window, click Share and add the content you'd like to share.
- Once you are done, wait for the producer to queue the next feed. The red box will disappear from your thumbnail. Make sure to mute the mic so that your audio doesn't bleed over the new feed.